How to integrate Confluence in Genie
Overview
Genie connects with Confluence to pull content into the architecture model. With Confluence integration, Genie can search Confluence for spaces and pages and display insights based on them, helping align documentation with the architecture model.
Prerequisites
For Jira configuration within Genie:
- The Genie account performing the configuration must have Admin privileges.
- The following Confluence application details must be available:
- Application URL
- Email address associated with a Confluence user account that has access to the required spaces
- Password or API Token for the Confluence application
Configuration Steps
Navigation Path:
Configuration → Tools & Integration → Confluence
Configuration Inputs
| Field | Description |
|---|---|
| Application URL | Enter the Confluence account URL. Example: https://companyname.atlassian.net/ |
| Enter the Confluence account’s Username/email | |
| Password / Token | Enter the existing password or API token for Confluence |
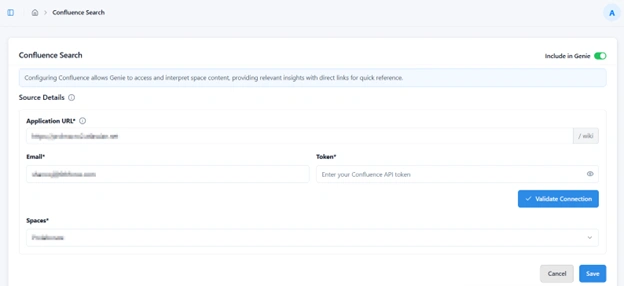
Initial Setup:
1. Enter the required details (Application URL, Email, password/API token).
2. Select Validate Connection to confirm successful authentication.

3. Once validated, available Confluence spaces appear in the Spaces dropdown.

4. Select the desired project and choose Save.
Editing an Existing Configuration
When modifying an existing Confluence configuration:
- Adjust the required fields as necessary.
- Select Validate Connection to re-authenticate the updated details.
- Choose Save to apply the revised configuration.
Enabling Jira for Genie Chat
To activate Confluence integration features within Genie Chat:
– Toggle Include in Genie Chat at the top-right corner of the Jira configuration page.
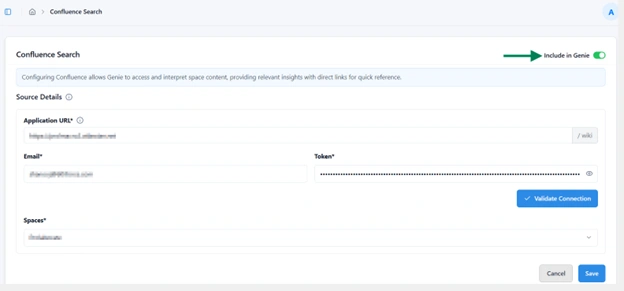
– When enabled, the Confluence agent will appear as shown in the image below. Once selected, the chat will respond exclusively to Confluence-related insights and actions.
Subscribe to our Newsletter
Get product updates, feature tips, and integration insights in your inbox.

